Design Challenge

Closed radial pattern with the same orientation applied to all samples.

Team of Jeremy, Adrian and Leslie

This demo is online, and can be viewed here.

The concept places all study samples on the same eight spokes and allows the user to select the study and variable by clicking the ‘wedges’  near the center.  Navigational highlights include:

1. Variables for each study are shown when the pointer is over each wedge and lines are then drawn upon mouse-down.

2. If a new variable is selected, which is different than the previously selected variable, the orientation is adjusted so that the current variable is on top.

3. The user can select all four studies by clicking the letters surrounding the spokes.

4. Values can be seen by placing the pointer over and individual dot (data point) and a circle is drawn to show the relative position of other points along other spokes.

5. The play button (which is currently not functional) will be used to animate between different time points in the longitudinal studies.

We are submitting the following visualizations:
– A heat map created in R: Association strength is encoded by lightness of color. Each column corresponds to a pair. In other words, we transformed the upper triangle of the matrix into a vector. Each row corresponds to a participant in each venue. Here we presented all the participants’ vector because in this way we see the contrast among groups with possible noise/variance.
– A visualization made up of cascading triangles showing the comparison between each “story” in each of the venues: In the parallel axis, nodes are placed. For a fixed node A, the pairs are presented by linking the left and right parallel axis with the width proportional to the association strength.   The same information in other network is presented in the same way linked to the next parallel axis.
A node-circle visualization created in Processing: Each circle is a node and each sub-region in a circle represent a network. The coloring of these regions corresponds to normalized relative centrality values. The bars shows the connection strength of a node with all other nodes in corresponding network. The thickness of each bar shows the relative strength of the connection.

The same plot but using the length of the bar as encoding for node link strength.

– An animated, horizontal stacked chart created in a spreadsheet software and Quicktime: Each scene is a “venue” showing each of the stories plotted against rest of the stories.
We created a visualization which uses human completion mechanisms instead of grouping mechanisms to show dense subsets of a matrix/graph.

Team members: Jim Hill, Ye Liu, Shuang Huang

Overview

Our goal is to develop a tool that will answer these two questions.

  1. Given a set of frame’s, what is the general distribution of the frames.
  2. Given two or more frames, how do they each compare.

To solve the first question we first decided that there must be a way to calculate the distance between two frames.  The method of calculation is not important, how it is visualized is.  We decide to pick a frame as a reference, which frame does not matter.  We then encode the distance of each frame from the reference as the distance of a green circle from the reference frame (red circle) located at the center of the screen.  Frames are spaced evely around the reference frame.  No information is encoded in the frame ordering.  The main window looks like this:

Main Window

This is an interactive visualization.  Hovering over any of the frames will display it’s name, clicking a frame will select it and double clicking will cause that frame to be used as the reference frame.

After selecting reference frames, clicking the compare button will bring up a compare window in which the frames are directly compared.  We have currently implemented two methods for comparing frames.

Encoding Differences using Lightness

We first find the difference matrix by subtracting one frames elements from the others.  This will result in a set of positive and negative numbers.  To visualize these differences, the size values are encoded using lightness of the color green for positive values and red for negative values.  A very light color represents a very small difference.  A solid green or solid red represents a very large difference.  The following is an image from the comparison:

Lightness Diff

This method of comparison can only compare two frames.

Encoding Differences using Bars

Our second method of encoding the difference between charts was to create a bar chart for each frame element to be compared.  The visualization still consists of a matrix of boxes, but each box contains a bar chart that shows the relative sizes of each element of each frame.  This allows for more than one frame to be visualized at one time.

Bar Diff

Source Code:

Currently this has only been tested on Linux.  It requires linking with the Qt libraries.  The source code can be found at:

http://www.cs.wisc.edu/~jshill4/cs838/DesignChal1/Project

Design Prototype

March 3, 2010

in Student Posts

Team: Emma Turetsky, Nakho Kim, Chaman Singh Verma

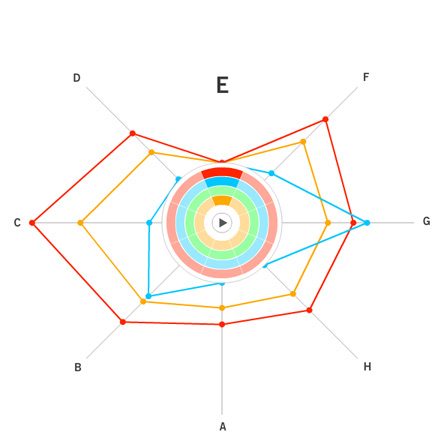
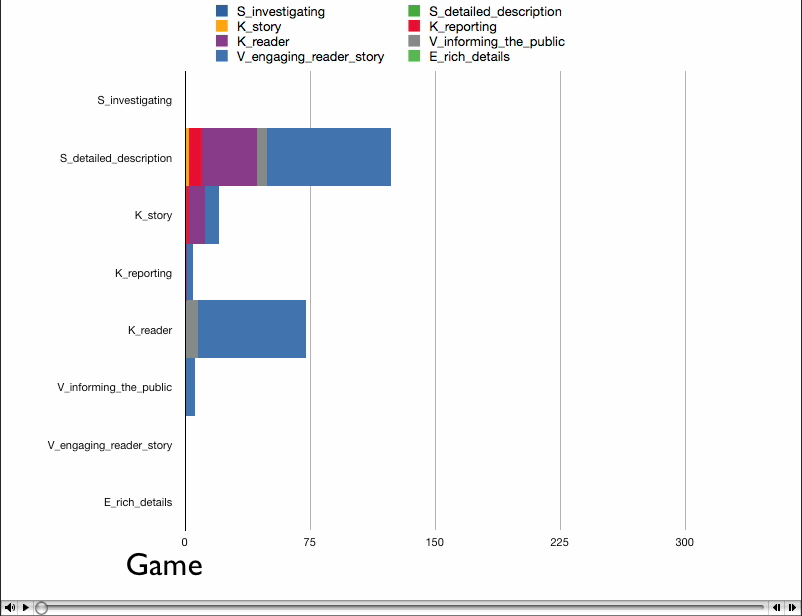
We felt this assignment contained two different problems. One was to get an overall picture or idea of the whole dataset, this would be a general view diagram, the other was to see how one skill or node relates to all the other nodes in the dataset and compare that between two datasets, this would be an egocentric diagram. It is very hard to do both together as it can easily clutter the visualization, making it harder to see the data and make it difficult for patterns to emerge, an example of this is the “spoke graph” the prof. Gleicher’s. So instead, we chose to focus on these problems seperately, rather than trying to do both at one time.

The egocentric approach, which is the one we ultimately chose, is the optimal way for showing individual node connections between one node and the others, but it is hard to show more than one degree of connectedness, making it hard to see the network overall as a whole, even if all the diagrams for the nodes are presented.

One of the major difficulties we saw with this approach was that there was too much clutter, especially around points with low correlation, so we decided to come up with a visualization which reduces the clutter without getting rid of the data completely. We chose a visualization of the second type, one which focuses on how the data relates to one data set, but can be easily compared between datasets.

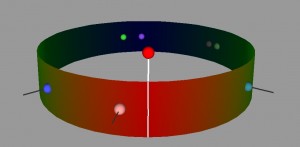
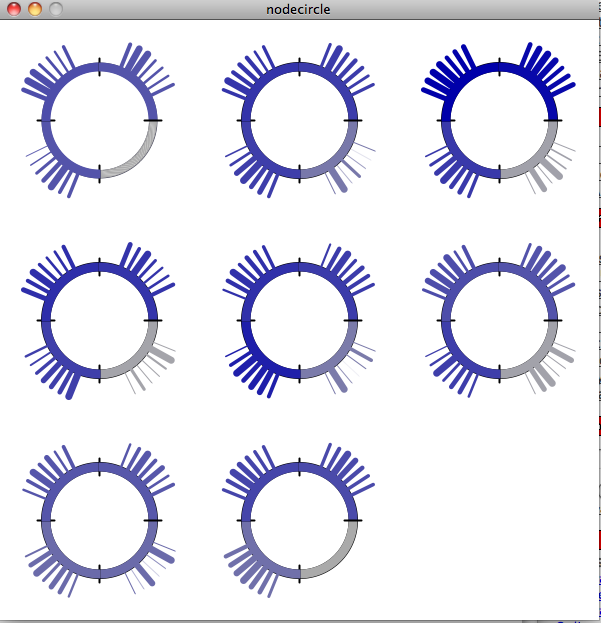
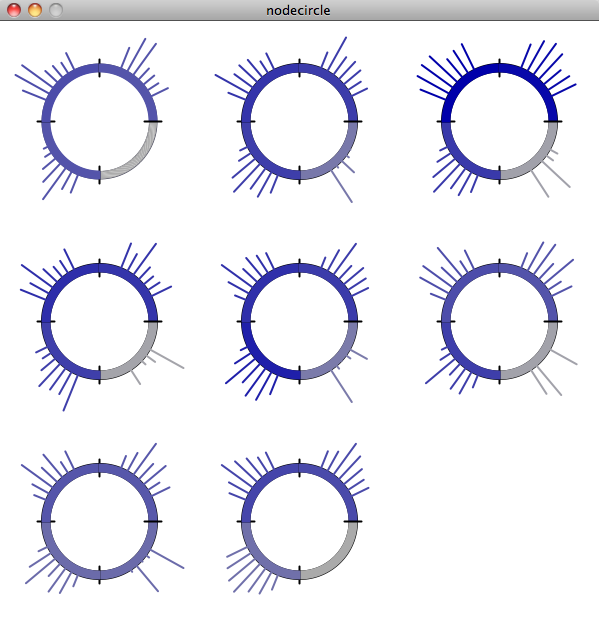
Our visualization is made up of a cylinder. There is a node sticking up vertically from the cylinder, this is the skill/point we are focusing on at the moment. When that point is in the center, you can see one half of the cylinder, the horizontal distance from the main point of the other points on the cylinder represent the correlation. So in this view, the edges of the cylinder are the .5 mark and the point opposite the focused node is 0. Note that this means that distance can be either to the right or the left of the focused point, but direction doesn’t matter. Where a point is vertically on the cylinder also does not matter, but can be used to show multiple points with the same of similar distance without having them overlap. If two points are the same horizontally but different vertically, they still have the same value.

The view can also be rotated so that if you wish to, you can see the points with lesser correlation on the other side of the column. What is nice about this view is that we can display multiple datasets on one column, as long as the focus point is the same. We have also show multiple focus points by stacking the columns on top of each other. While the prototype is not completely finished, we have a program which gives the general idea of what we are trying to achieve.

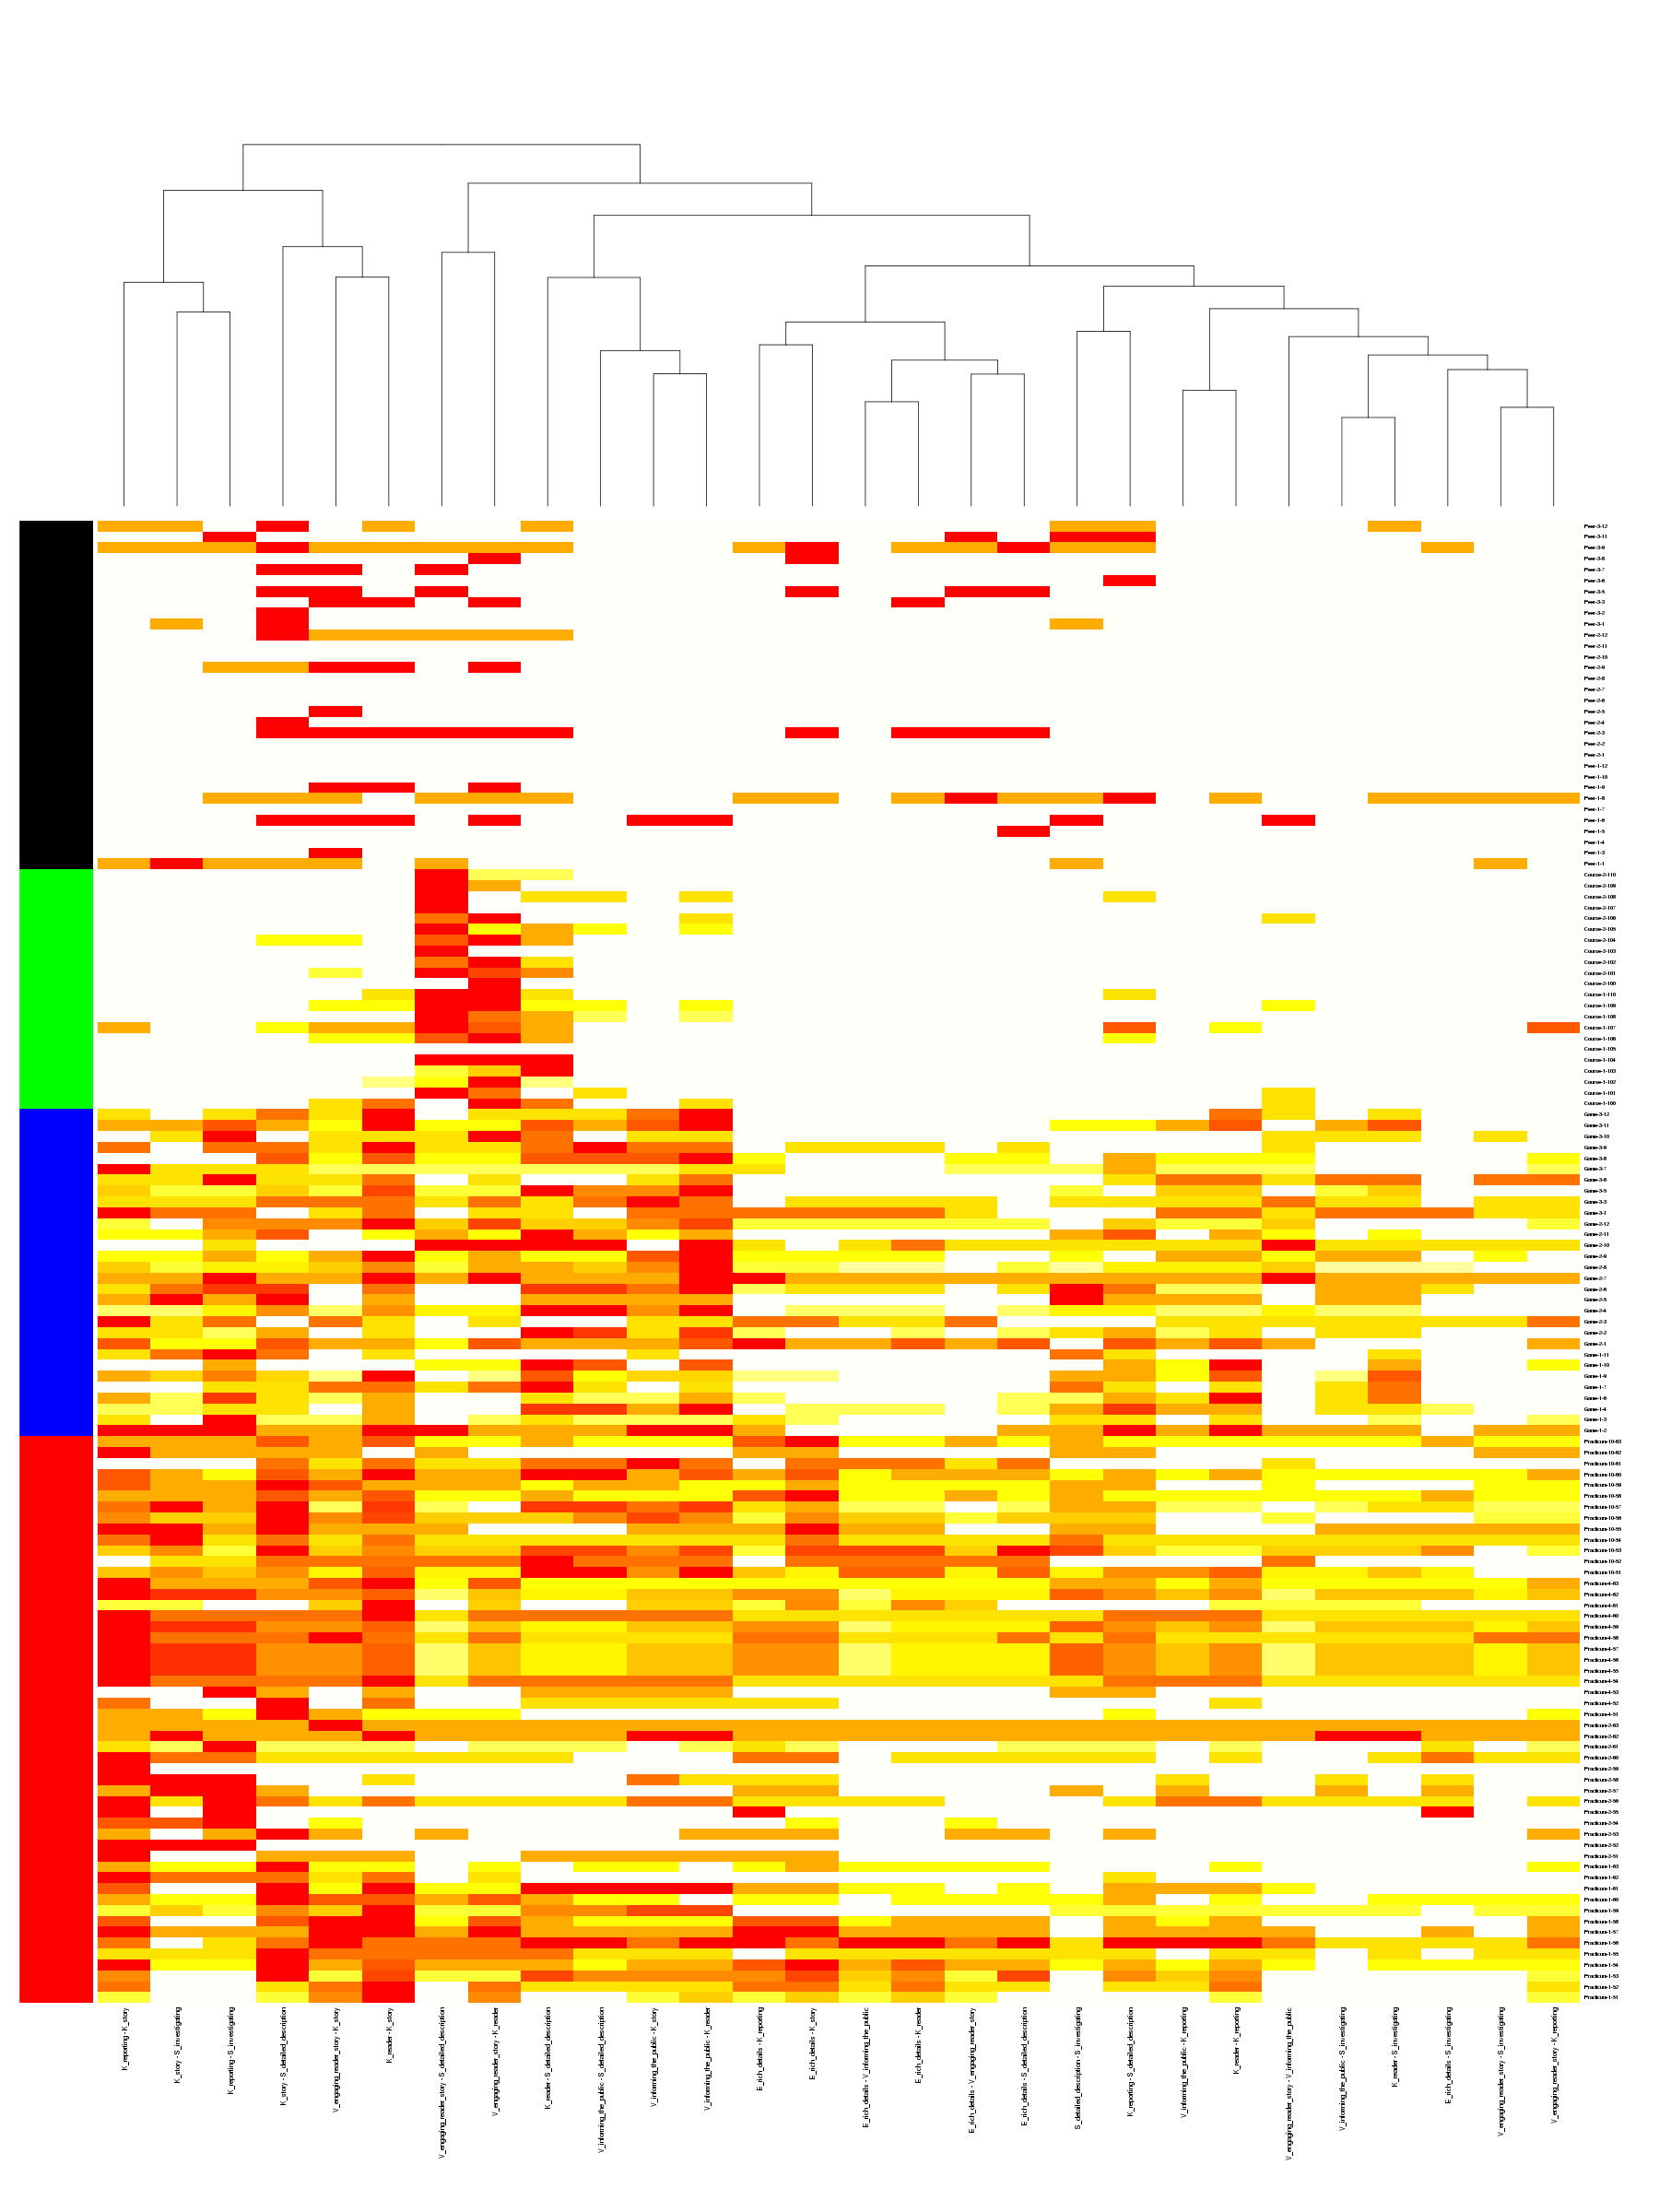
For a general view diagram, the idea is to show the network as a whole. The problem with this is that it gets easily cluttered and makes it hard to read individual connections. In a general view diagram, if the data points hold fixed positions, it’s easy to compare to or more networks, but hard to make a comparison. One example of this is the “golfball” view shown in class. If, in a network diagram, node positions are reordered depending on the dataset, it’s easy to see patterns within one dataset, but extremely difficult to compare between datasets.

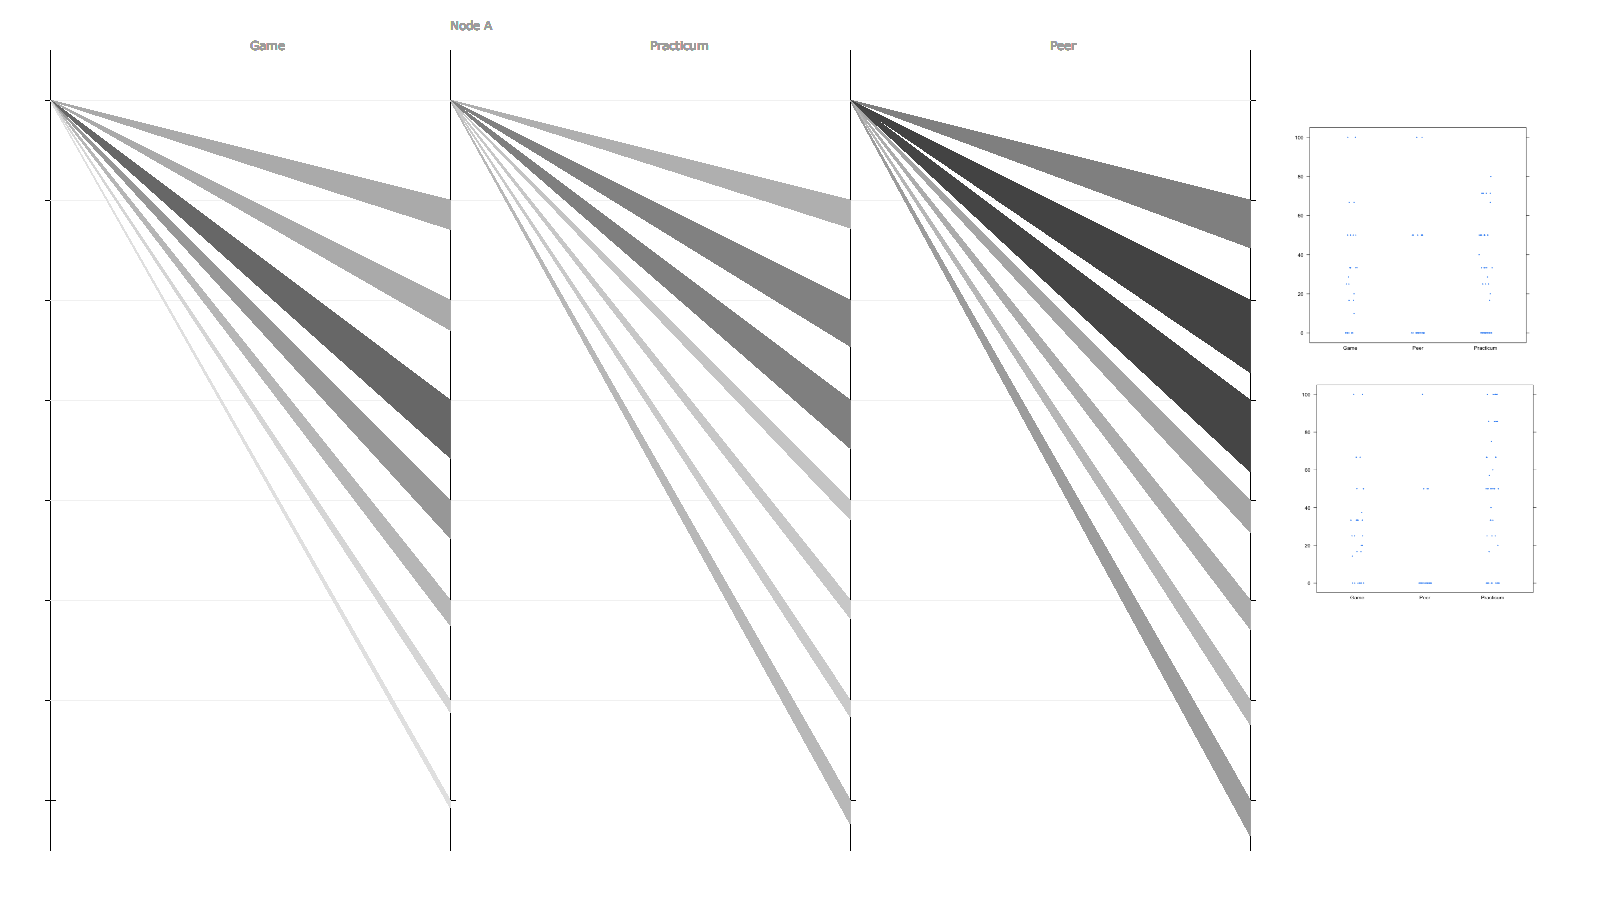
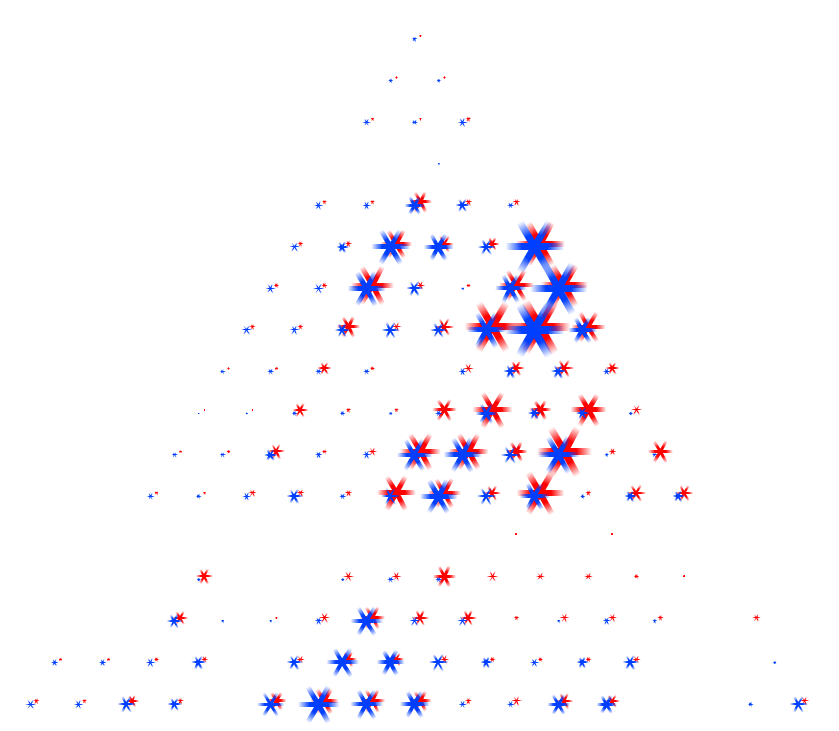
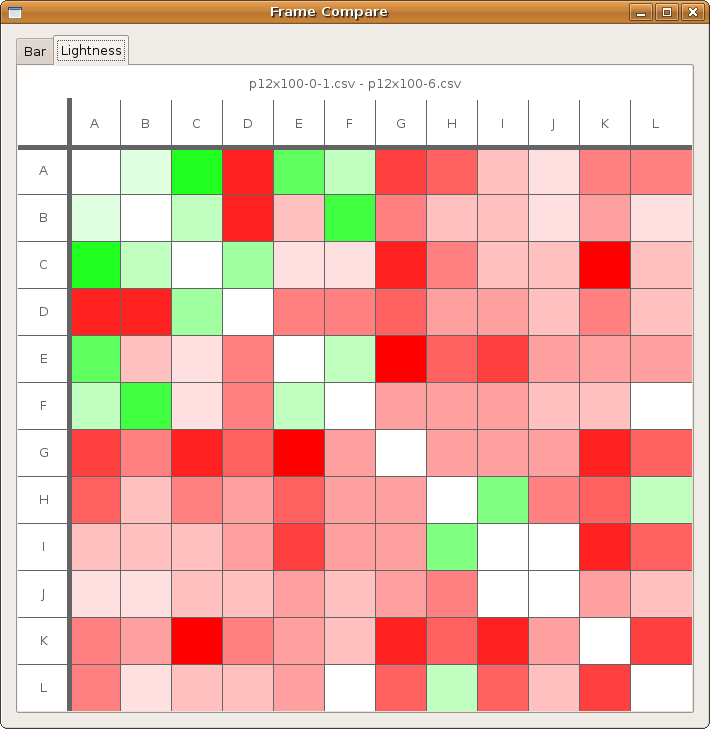
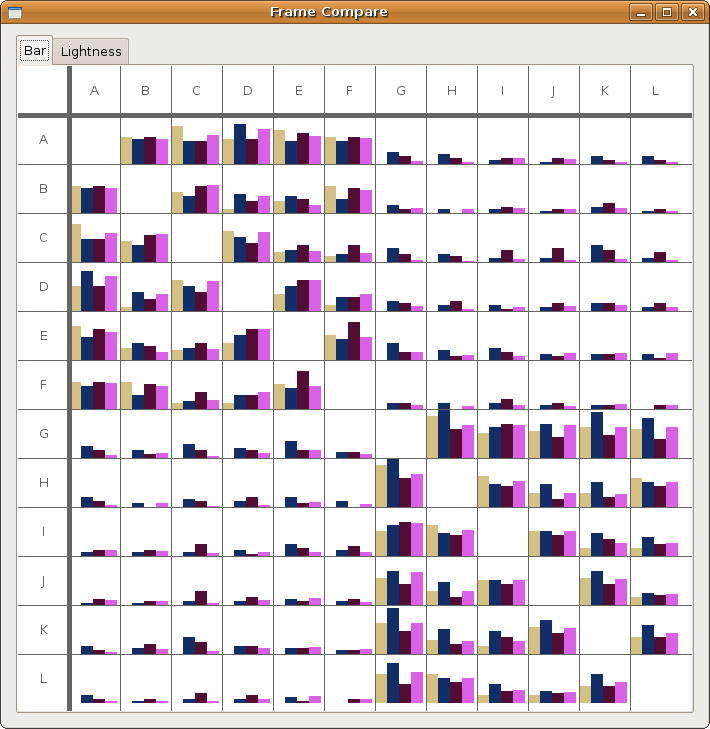
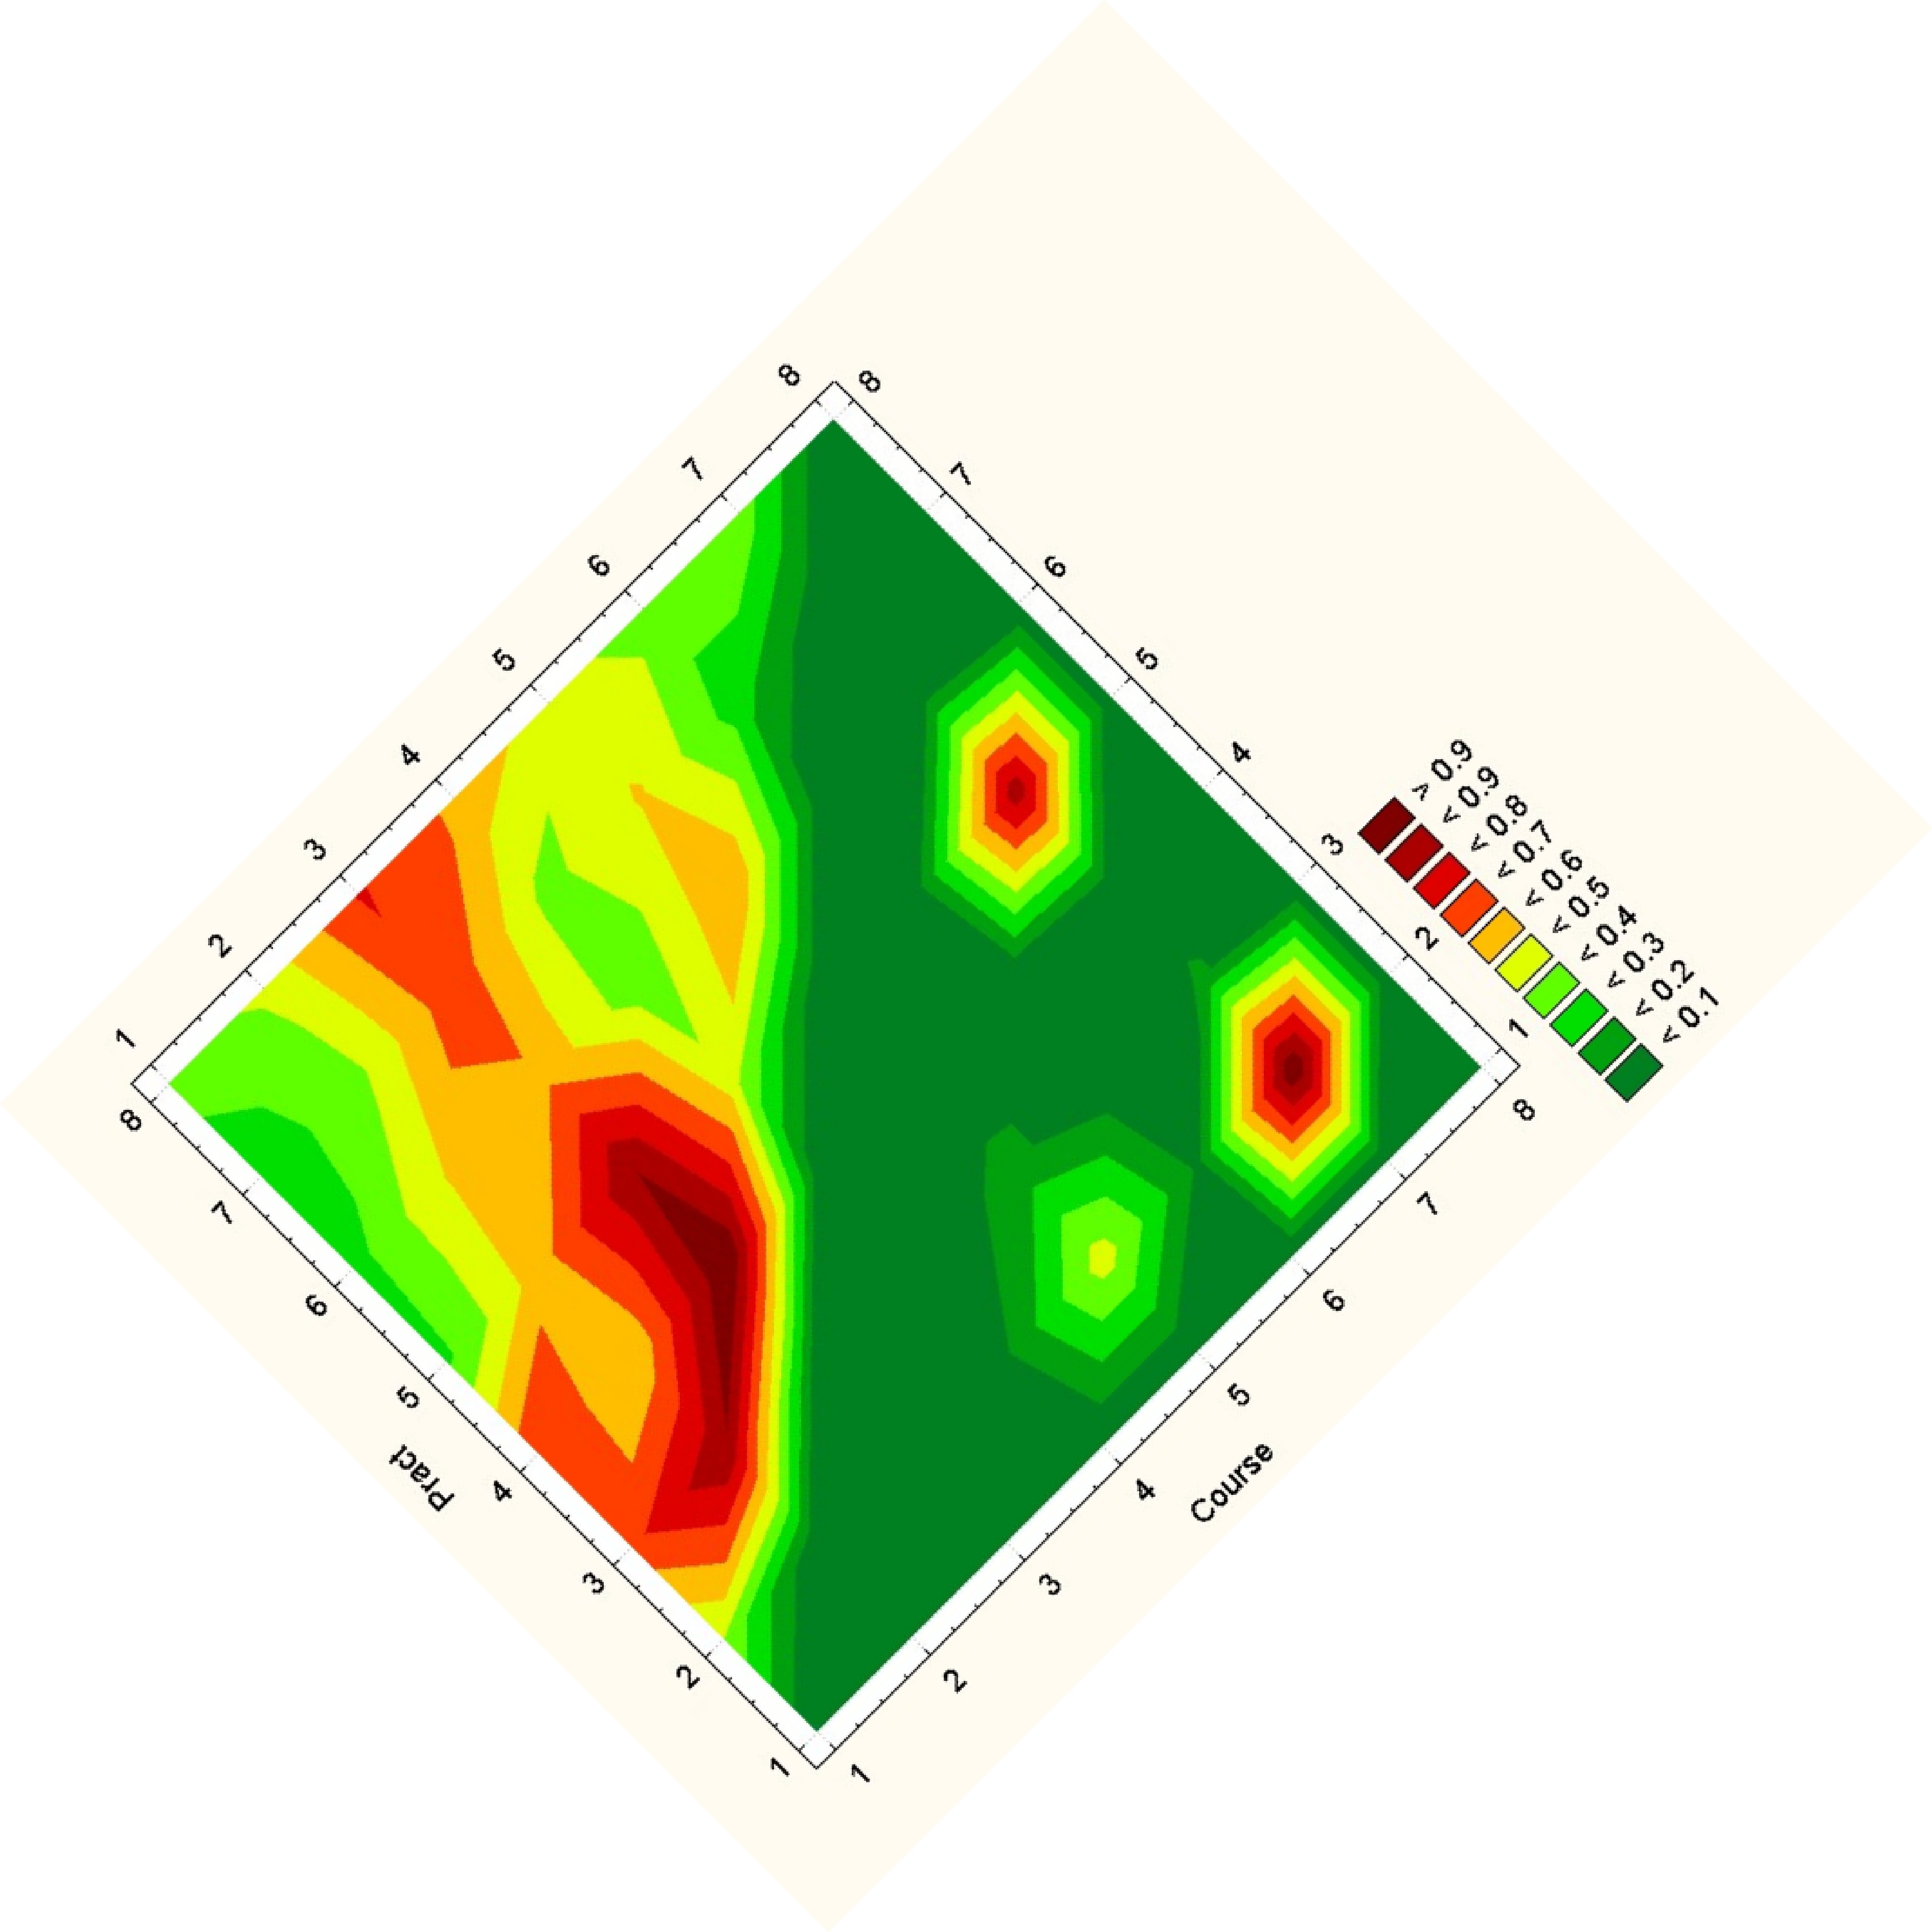
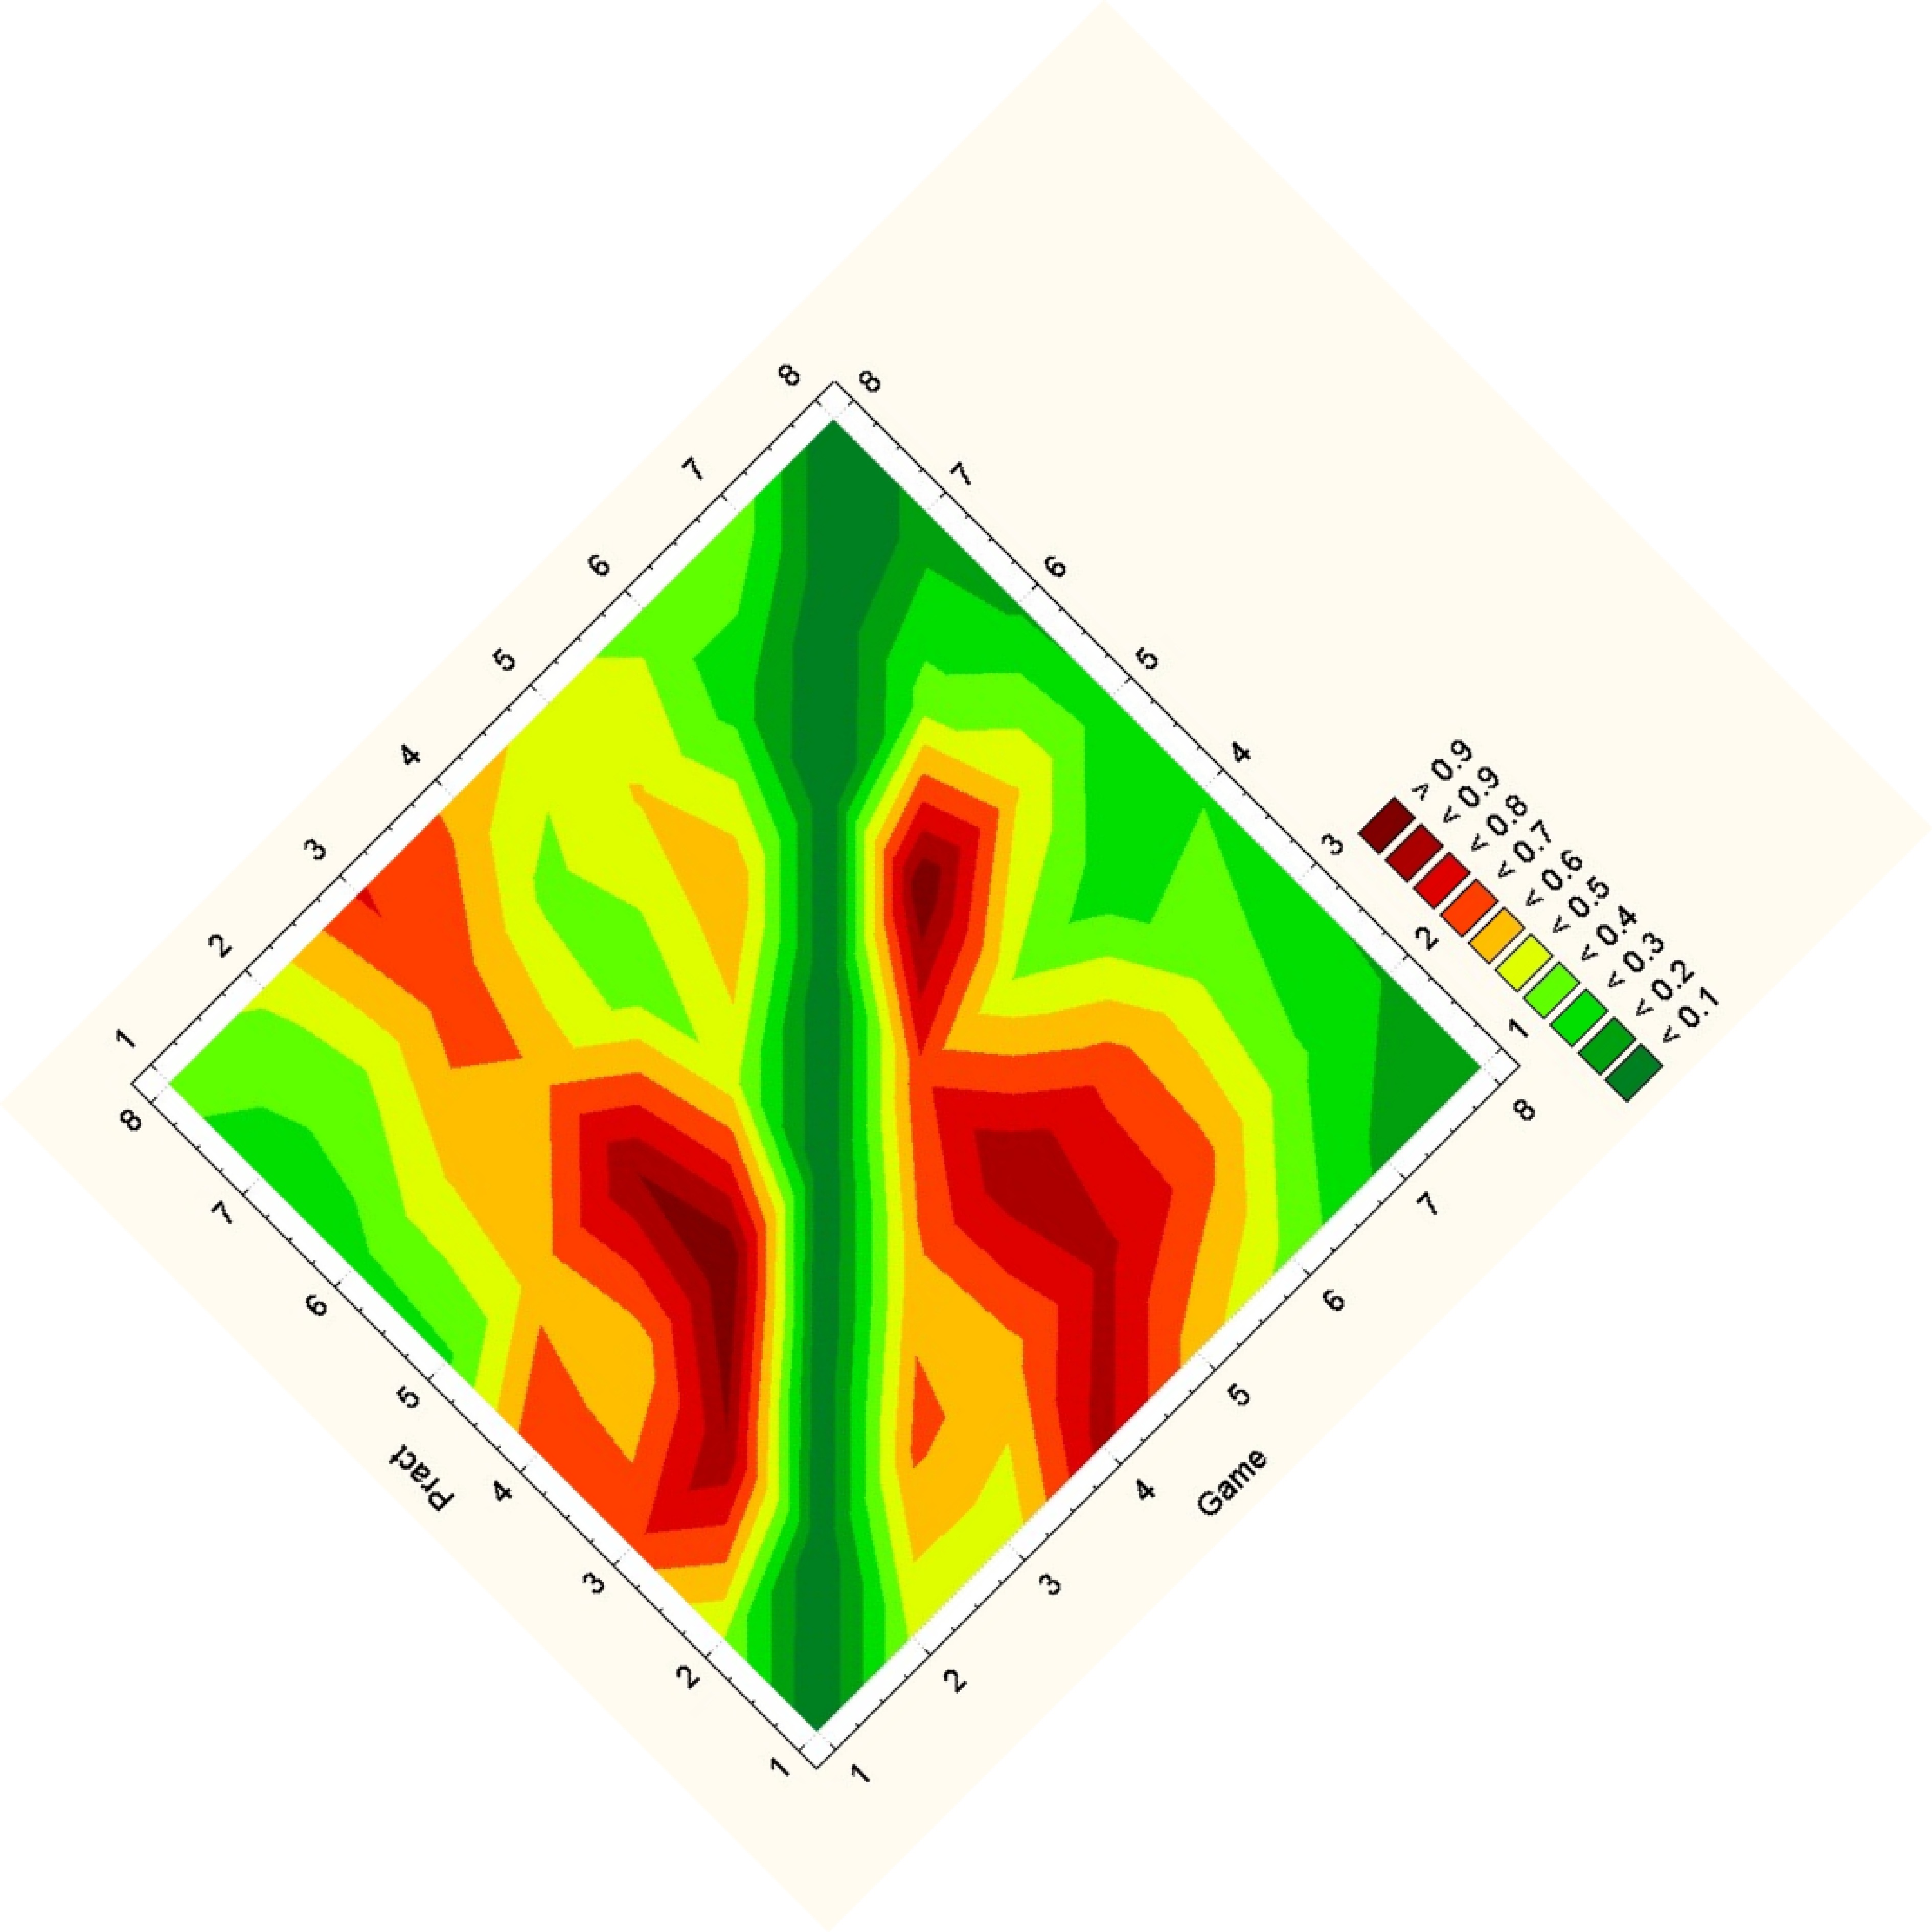
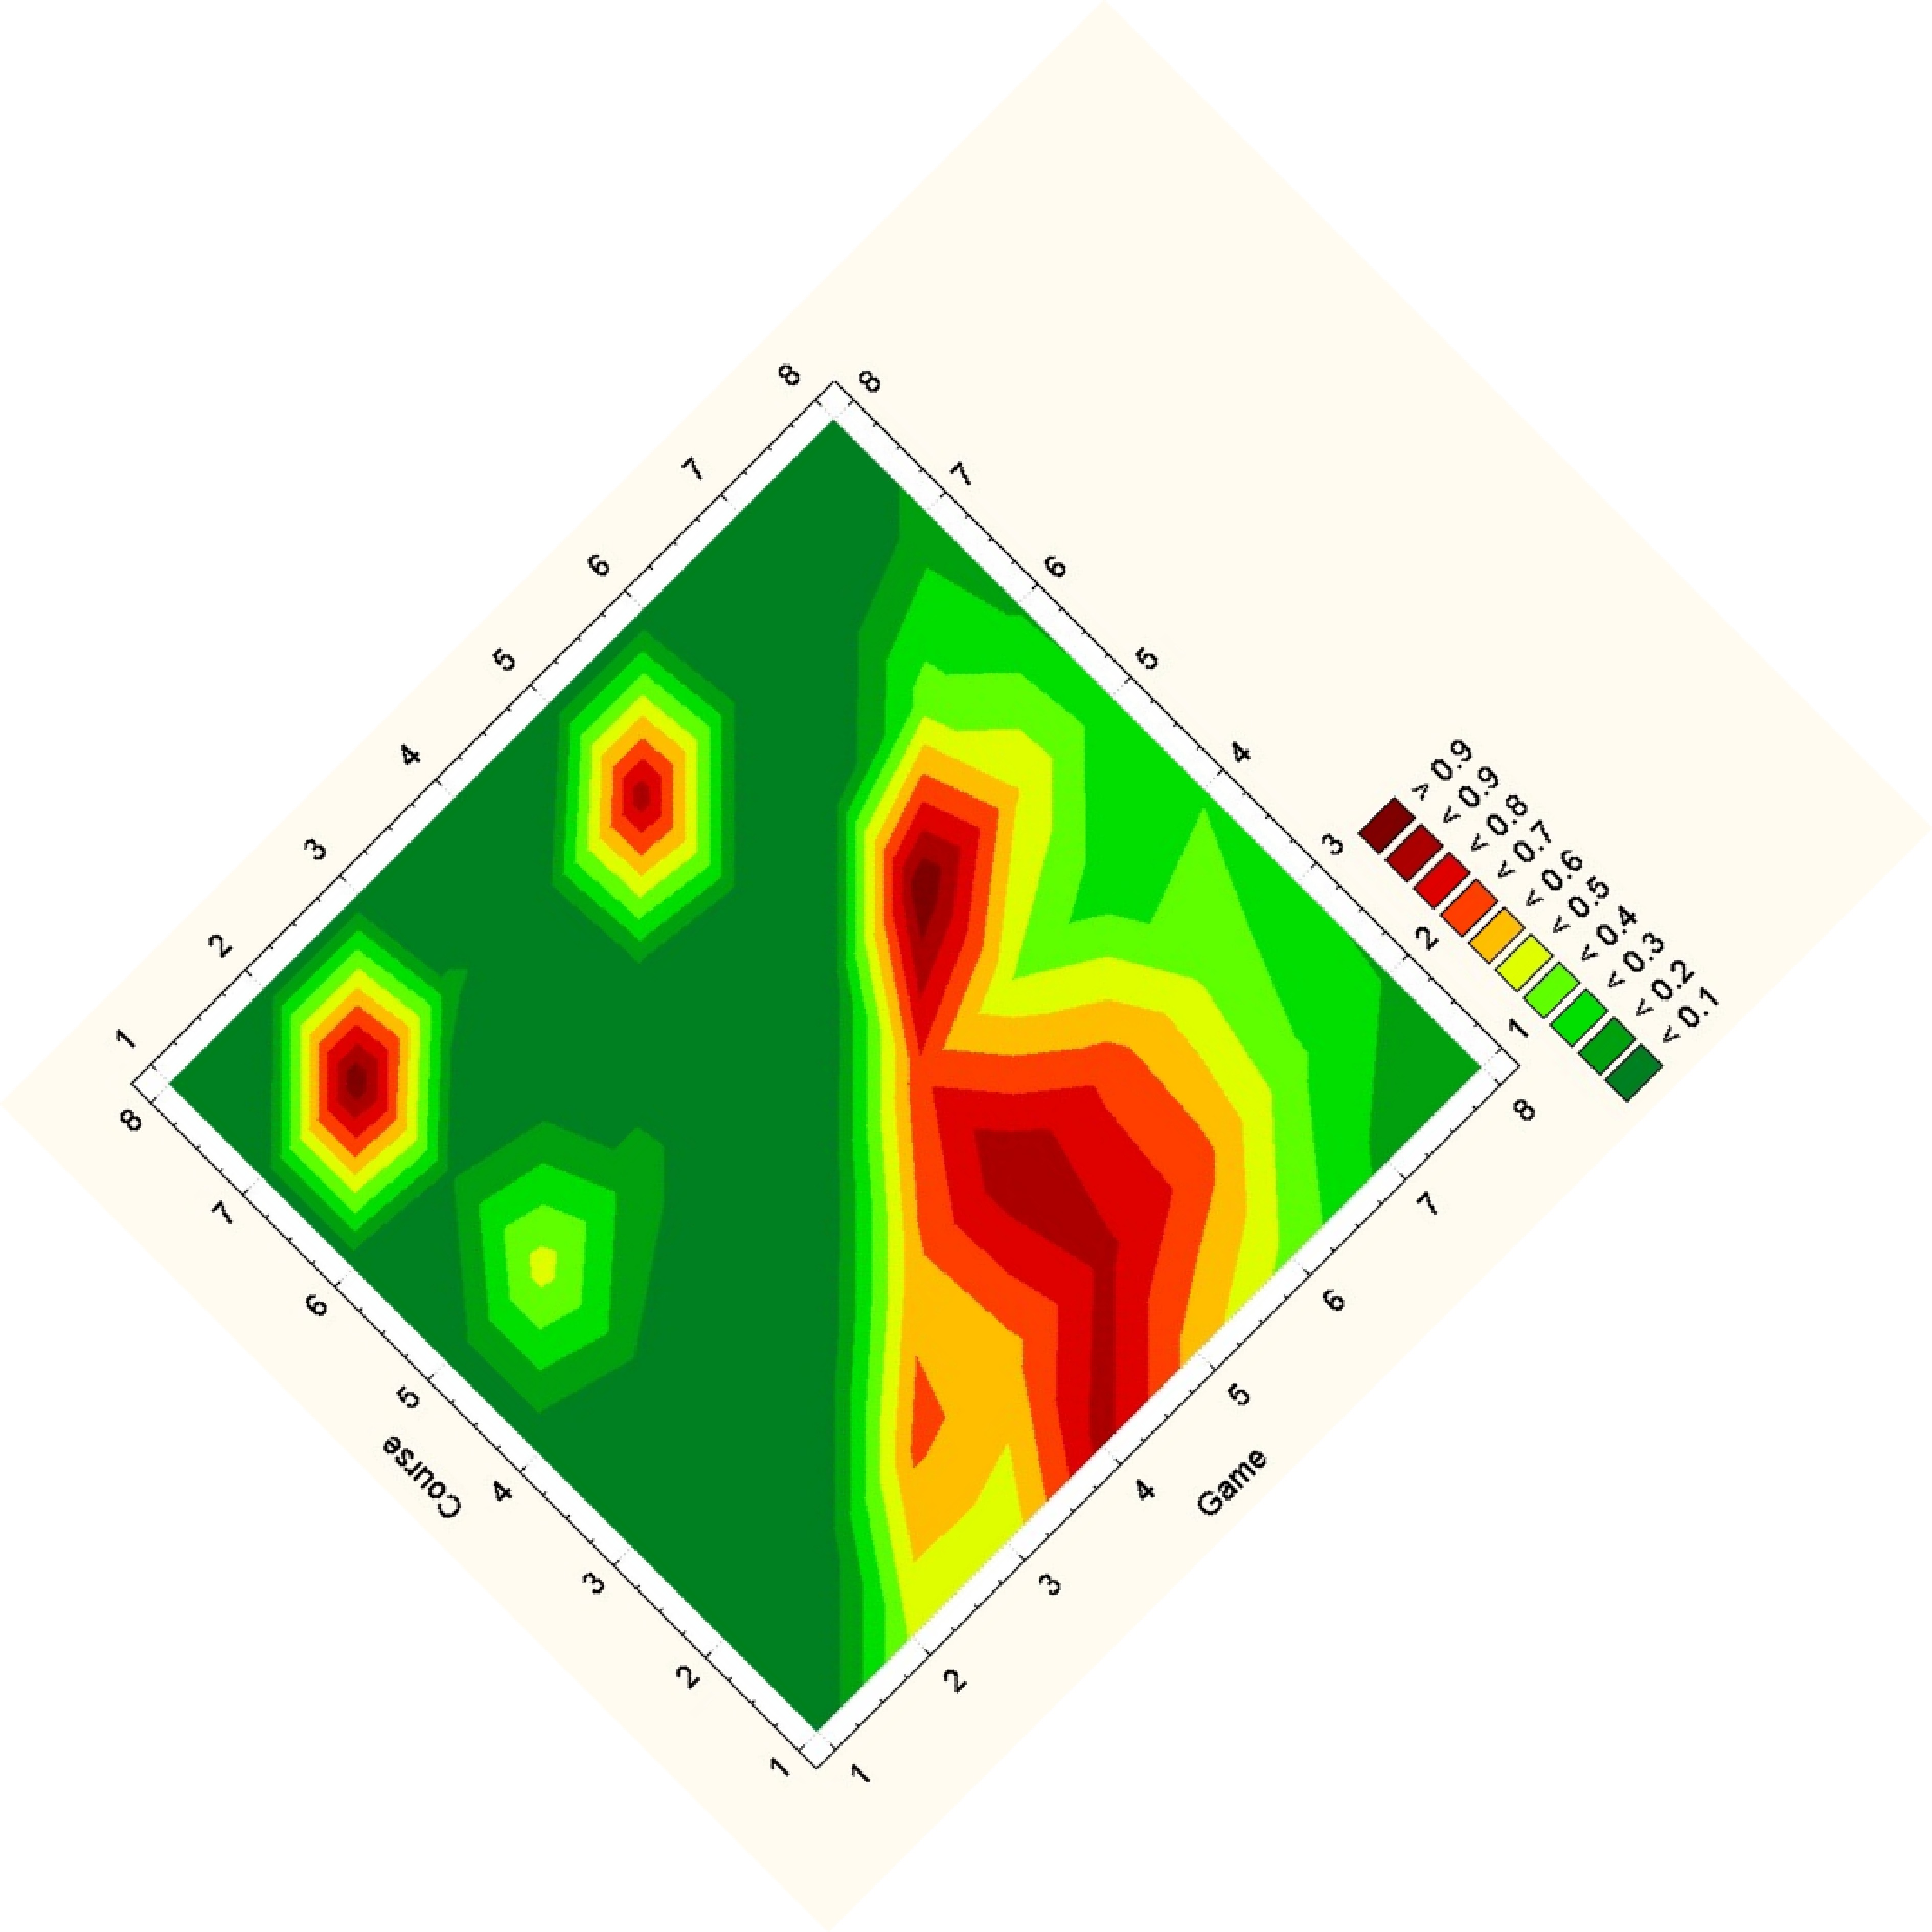
For an overall view, we decoded to use a fixed comparison of data matrices. We did this by essentially using the given matrix as the x and y coordinates in a plot and the correlation as some other value, in this case color. Then we noticed that since the matrices are identical, we could replace one triangle of a matrix with the other to get one graph where the coordinates on one side are symmetric with the coordinates on the other side. Doing this for a wafer plot gives us the following three plots.

Note that while you can clearly tell that the datasets have some differences, it is really hard to see what exactly those differences are. Due to the statistical software used, a gradient is formed, so though the original data on the vertices are distinct points, these plots imply and idea of connection and intermediate points between the data.

Another Simple Example

February 27, 2010

in Uncategorized

Here is a simple example of a trajectory (an evolution of the group).

In each case, we start out with things in 2 groups, and the nodes reconnect into 3 groups. There are 3 intermediate steps.

I have generated this data for two different network sizes (12 and 18).

To make things easier, I have not permuted the groups when things are divided into 3 (so, the groups are [0,1,2,3] [4,5,6,7] [8,9,10,11]). But I have also included cases where everything is permuted.

The file naming convention is: bg18pn_000_100.csv which means:

  • 18 = 18 node network
  • pn = start (2 groups) is permuted, end (3 groups) is not permuted (pp=both beginning and end are permuted)
  • 0% of the start
  • 100% of the end

Some examples:

Big ZIP of n=12,18,24, with and without permuted ends: bg.zip

Some of you have asked about what are the “expectations” for what you will create for the design challenge.

I have one very elegant solution to the design problem, but implementing the
idea may take longer than 4th March deadline. What is your expectation
in this work?

Clearly, it is easy to come up with designs that are too hard to implement. Indeed, its probably possible to come up with designs that are too much effort to really be worthwhile for the problem.

If you have an idea, you should try to prototype it. Prototype can have a wide range of meanings. From very “low fidelity” prototypes, to detailed implementations. If you have an idea that would be really hard to implement, maybe you’ll want to prototype it first using some simple mockup – pencil and paper sketches, or a storyboard of pictures of what it would look like. For other ideas, it might be practical to get an implementation such that you can try it out on real data.

There is a tradeoff: on one hand, its nice to have more ideas than you can implement, or fancier ideas than you can implement. On the other hand, there’s a lot to be said for being able to try your ideas on real data. There’s also something to be said for ideas that are easy to implement: if you have an otherwise awesome design that would be too time consuming (costly) to implement, in practice, that might be less useful than something that is more practical.

For March 4th, your focus should be on having ideas your ideas in a form that you can convey to the domain experts for feedback. It is more compelling if they can see things on real data (and “real” simulated data). But it might be just as (or more) compelling if you have a totally amazing design that you explain with pictures and good arguments.

My hope is that each group will do a lot of thinking and designing, and at least a little bit of implementing.

Here is another set of real data. This data comes from a single venue, and represents 4 “stories” that the students wrote over the semester (its 1,2,4,10). Is there a progression over time?

Some Real Data

February 23, 2010

in Uncategorized

Here is some real data for the design challenge.

These are 8×8 matrices (for an 8 concept epistemic frame). There were 3 sets of students (practicum, game, and course). Each of these matrices represents the average over all students in the set (known as venue) and all of the “stories” in the venue.

If you want, the labels for the 8 nodes (in order) are:

S_investigating
S_detailed_description
K_story
K_reporting
K_reader
V_informing_the_public
V_engaging_reader_story
E_rich_details

Design Challenge Teams

February 18, 2010

in Uncategorized

With 16 people, there is a team of 4 and 4 teams of 3.

While having a diverse set of people in class makes things interesting, it can also complicate teamwork since people are distributed all over campus. I do appreciate the efforts that people make in working togeher – hopefully the experience of collaborating with people from outside your field will make up for the inconvenience of having to deal with distance.

  • Albers, Danielle    Vack, Nate    Hinrichs, Christopher
  • He, David    Kishor, Puneet    Faisal, Khan    Moon, Jee Young
  • Hill, James    Liu, Ye    Huang, Shuang
  • Mayorga, Adrian    White, Jeremy    Watkins, Leslie
  • Turetsky, Emma    Kim, Nakho    Verma, Chaman Singh

We will provide time in class for teams to talk and coordinate.

My hope is that teams will work together to develop solutions to the challenge, but I understand that collaboration can be challenging. Having subsets of the the team develop solutions (leading to multiple solutions) that are then just combined into a coordinated presentation is OK if you really can’t find ways to work together.

In order to keep the “assignments” category clean, I am putting posts about example data for the design challenge under a tag: DC Example Data. If you go to that link, you’ll see all the posts about example data. There’s not much there yet, but keep watching…