Team members: Jim Hill, Ye Liu, Shuang Huang
Overview
Our goal is to develop a tool that will answer these two questions.
- Given a set of frame’s, what is the general distribution of the frames.
- Given two or more frames, how do they each compare.
To solve the first question we first decided that there must be a way to calculate the distance between two frames. The method of calculation is not important, how it is visualized is. We decide to pick a frame as a reference, which frame does not matter. We then encode the distance of each frame from the reference as the distance of a green circle from the reference frame (red circle) located at the center of the screen. Frames are spaced evely around the reference frame. No information is encoded in the frame ordering. The main window looks like this:

This is an interactive visualization. Hovering over any of the frames will display it’s name, clicking a frame will select it and double clicking will cause that frame to be used as the reference frame.
After selecting reference frames, clicking the compare button will bring up a compare window in which the frames are directly compared. We have currently implemented two methods for comparing frames.
Encoding Differences using Lightness
We first find the difference matrix by subtracting one frames elements from the others. This will result in a set of positive and negative numbers. To visualize these differences, the size values are encoded using lightness of the color green for positive values and red for negative values. A very light color represents a very small difference. A solid green or solid red represents a very large difference. The following is an image from the comparison:
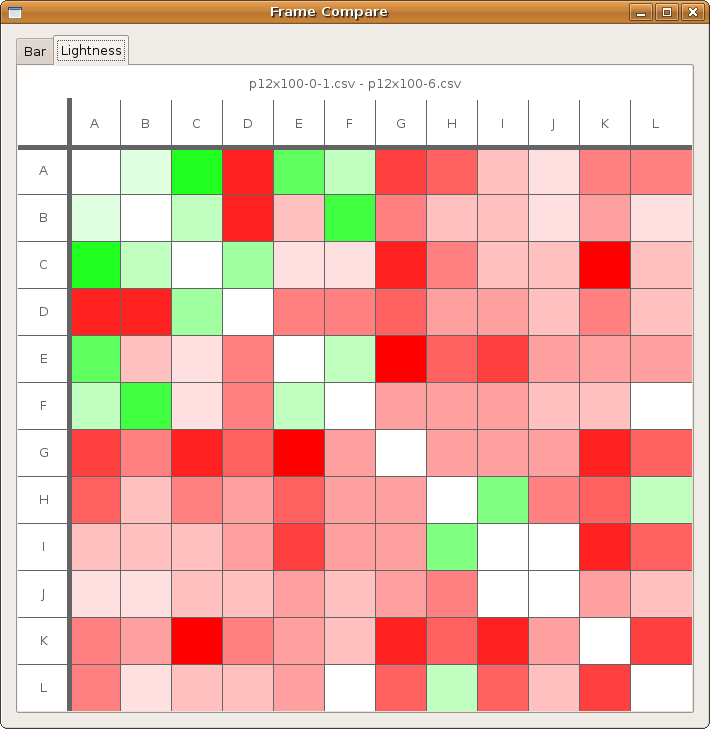
This method of comparison can only compare two frames.
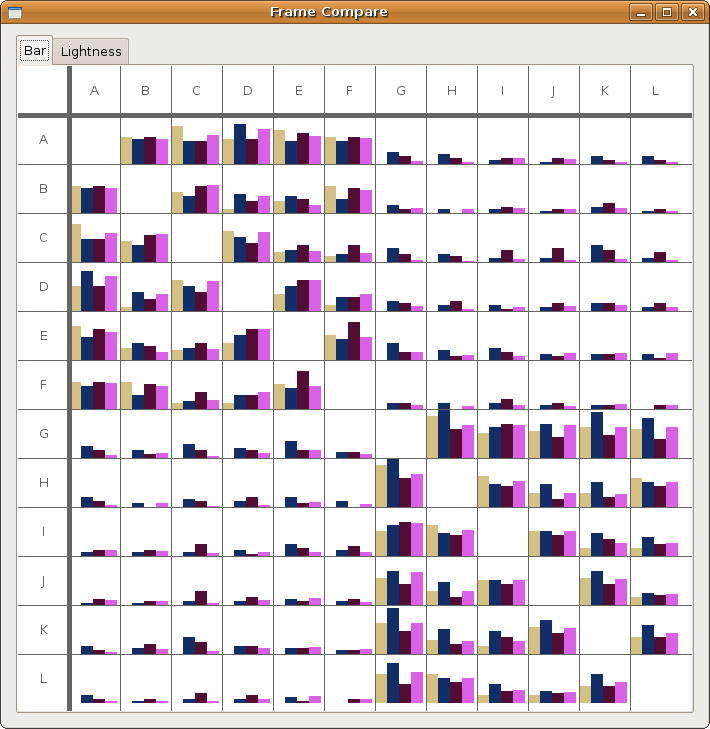
Encoding Differences using Bars
Our second method of encoding the difference between charts was to create a bar chart for each frame element to be compared. The visualization still consists of a matrix of boxes, but each box contains a bar chart that shows the relative sizes of each element of each frame. This allows for more than one frame to be visualized at one time.
Source Code:
Currently this has only been tested on Linux. It requires linking with the Qt libraries. The source code can be found at:
{ 12 comments }
– In the first visualization, why do you put matrixes in 2-D not 1-D?
– You could use same colors in the first and the third visualization.
We put them in 2-D as 1-D allows less space for the nodes, and might be a little messier to identify each matrix.
I have a similar opinion as Jeeyoung for the first vis. Since it uses only one variable of the network and encodes it as distance, just ordering them in one line could make it easier to read. As for the bar comparison, I think it could be quite useful for datasets representing change over time.
The first design is good, when an user is directly interacting with the machine, but when using this technique on traditional paper, it has the same difficulties as graph plotting. It has less cluttering.
The second design is standard matrix display which is simple, but probably choice of colors is difficult task. One difficulty with this is that it is hard to distinguish colors, so probably numbers should also be printed in the box.
The third design is good for small dataset, but I am not quite sure how it will scale when the dimension grow to 10-15. This design may require large space.
I agree with Jeeyoung and Nakho, but it might be impossible depending on how the distances are calculated. It’s quite possible that the distance metric doesn’t support transitivity in such a way.
I like the idea of being able to compare many matrices on top of each other in the third way. Unfortunately, I can see it creating visual patterns that may not exist in the data.
The second design is simple, but I can begin to see patterns and maybe cliques, so I like it.
I like the first and last visualizations, since you can see more than one matrix at one time.
However, I think the best thing about this system is that it looks like it could be extended very easily to support even more types of visualizations. The fact that you can have different views of the same frames seems very useful. Being consistent with the colors across the system seems like a must though, and adding a key someplace too.
I think the creation of a stand-alone piece of software is a good approach. The first image (node in center with connected nodes) gives a good impression of the overall strength of the collective values, but it might help to add something indicating how the data are weighted for each node (line width, circle border color, shape/orientation, etc.).
The bar and lightness tables are a good way make comparisons. It would be nice if the user to ghost out particular rows, columns or sections in order to reduce the visual impact of cells that are not pertinent when making comparisons. Allowing the user to adjust the display could also eliminate the redundant tabular data.
The consideration of “tool construction” and the customization of the view in the graph view was really nicely done. It is really evident that a lot of thought went into the design and the graph itself is very clean and easy to understand.
However, the use of transparency over two different colors in the matrix view may be a little confusing. Using more of a color ramp may help make this view be a little more easily interpretable.
I like that you tackled this problem at 3 distinct scales– two matrices, a few (3-5) matrices, and several (6-?) matrices. All three components combined show a very comprehensive view of the data. Since you’re able to indicate distance between matrices and the direction of that distance in the last two views, could you find some way to incorporate directional information into the first view (for the sake of consistency)?
I liked their first visualization as an interactive way of exploring data. The design philosophy of giving more importance to comparison and not the metrics used is neat. The domain scientists can come up with better measures for comparison given such tool along with a way to easily extend it. I would suggest using different colors for each frame to associate it with the matrix file it represent.
I have similar comments for the second matrix view as other’s group matrix visualization. The lack of clustering or pattern in underlying data make it harder to get any meaningful information out of this view.
For last node strength comparison across network, I would prefer getting rid of symmetry part of comparison. Also the color encoding for each frame can be consistent across the visualization e.g. in first visualization and this.
I like this a great deal — the combination of a distance-based and matrix comparison view seems a great way to get a combination of a big-picture and detailed comparison of the data.
For a distance metric, you might check out the RV coefficient.
Also, in the distance view, it might work well to replace the representative dots with some more integral sort of label…
I like the first visualization because it shows distances between pairs of matrices in a navigable manner.