Last modified:
UPDATE 11/19/99: There will be no Questions to answer for this assignment.
Please check back for updates, which are likely to be plentiful in the early stages. Some of the details are intentionally omitted at first to encourage you to focus your energies on the more important parts.
Late assignments will be accepted (according the to project late policy) until 5pm, Friday, November 19th. We will not accept later assignments!
WARNING: in order to give you adequate time for a 3D project at the end of the semester, the final project will be assigned before this one is due. Start early! While this project may be less work than the previous one, you will have other things to do for this class during the time period.
In this project, you will build a basic 2D animation system for drawing and animating hierarchical models.
I call it "cardboard cutouts" because (in the basic form) your system will emulate a type of animation made by taking pieces of cardboard and moving them around. (There was a lot of this done on old Monty Python shows). Each object may be a very complicated picture, but they are only moved around (translated and rotated) over the couse of the animation. The pieces may also be pinned together to make hinges.
Your system will allow the user to make an initial drawing consisting of a number of "pieces" (the pieces of cardboard). The user may attach these pieces together, and rotate and translate them. Your system will allow the user to pose these pieces at a number of "key frames" and create animation by interpolating them.
This project will stress your understanding of (and skills with):
You are to write this program doing the drawing with the OpenGL graphics library under windows NT. (You may develop your program under other systems, but as with other assignments in this class, you will be required to demonstrate your code on the machines in the CS instructional labs). You may use whatever user interface tools you wish (we recommend FlTk, but GLUT would be an acceptible alternative).
A sample version of the program (pretty basic, no fancy features, and a thrown together user interface) is available for you to play with in p:/course/cs638-gleicher/public/bin/cutout.exe. In case you're wondering, the example program is around 1000 lines of code, although I haven't commented it very well yet.
While this project will probably not require as much code as the first project, it is still a sizeable programming excersize. More importantly, it may be conceptually more challenging as it requires you to work through matrices and hierarchies, and your code may be more complicated as you must build data structures to represent and manipulate the hierarchical models.
Because of the way grading works, it is much more important to get the basics right than to get some of the fancier features.
Be sure to think and plan BEFORE you write any code. Having a general strategy about how to tackle this project is the key to doing it. It's too big to swallow whole.
You are permitted to use the example code (remember to attribute code that you get from elsewhere), user interface toolkits, "general purpose" data structure libraries (like the STL), and OpenGL. If there is some other code that you would like to use, please ask first.
Last time, I tried to divide the parts into BASIC, ADVANCED, and BONUS. This time, I will be less explicit. However, it is still the case that there is a basic functionality that everyone should be able to implement. Getting beyond this will probably differentiate the range of talents in the class. We expect the curve to balance all this out.
Your program must allow the user to draw the shapes that will be arranged. The user must be able to do this with a click-drag (preferably rubberband) interface.
A basic version of the system would only allow the user to create rectangles. Fancier systems would allow other shapes. One nice feature would be to allow the rectangles to contain images (for example TIF images) that could be loaded. (if you want to do this, you will need to learn about texture mapping - we will not get to texture mapping in class in time for the project).
You should allow the user to put objects in front of (or behind) other objects. This will be important when they get pinned together. We call this the "stacking order" (e.g. what's stacked on top of what else).
You must allow the user to translate and rotate the shapes. You may allow scaling as well. (Scaling should behave like rotating in the later discussions of Pinning).
When shapes are rotated, they must rotate around their "center" (for a reasonable definition of center), unless they are pinned.
In cardboard cutout animation, pins hold pieces together to make hinges so that things like articulated figures are easier to animate. In your system, pins will create hierarchy.
You must allow the user to pin 2 shapes together. When pinned, the top piece becomes the "child" and the bottom becomes the "parent". A child may only have one parent.
You must allow the user to place the pin anywhere that the 2 shapes overlap. If the shapes are more complicated than rectangles, you may approximate this.
The action of pinning 2 pieces should not cause them to move! (they may be moved around before and after pinning).
When pinned pieces are translated, the entire pinned structure translates rigidly.
Pinned objects rotation behaves as follows:
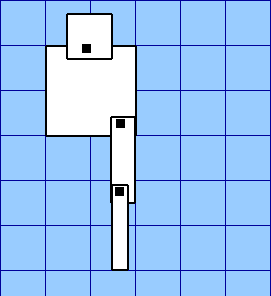
This is best explained with a picture. Suppose we start with a bunch of pinned objects.
Notice that in this picture, the biggest square is the "root", and the pins are noted by black dots.
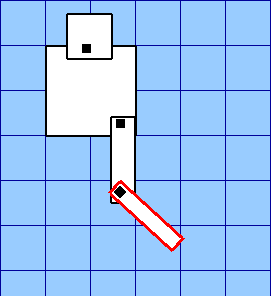
If we rotate the lowest rectangle, it rotates around its pin:
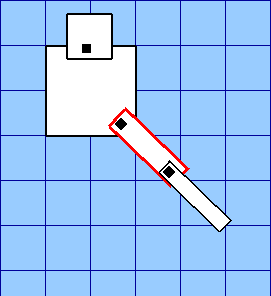
If we rotate the middle rectangle, it too rotates around its pin. However, all of its children also rotate.
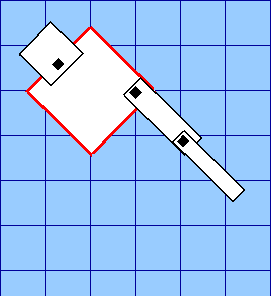
If we rotate the root piece, it rotates around its center. All of its children (and their children) rotate with it.
You must allow the user to animate the drawings by specifying keyframes. You should think about how to allow the user to do this.
You must allow the user to flip through the frames of the animation (for example using a slider) as well as providing a "play" option to play the animation. Examples of how to do this are in the sample code.
You must at least implement linear interpolation. Giving the user choices of other types (such as Catmull-Rom splines) would be better.
You must implement save an load for your system. Saving a drawing/animation should load back in exactly the same. You must save the drawing and the keyframes.
There is no standard file format that we are specifying. You must decide what information needs to be saved and how to save it.
Here are a number of simplifying assumptions you may make to simplify your project. Many of these are done in the sample project.
Note: for each simplication, you must say that you made this simplification in your documentation.
1. You may limit the user to only pinning together pieces that have not yet been rotated.
2. Pinning pieces together may change the "stacking order" of the pieces, however, a piece must never be hidden by its parent.
3. You may require the user to do all "drawing" (e.g. creating pieces and pinning them together) before "animating."
4. You may make the animation be a fixed length of time.
5. You may assume the structure of the animation is fixed during the animation. That is, only the translations and rotations (and scales if you implemented them) need to be animated.
The example solutions makes all of these simplifications.
While a basic project will allow a user to create a simple animation (and from past experience in other classes, creative use of simple tools can still lead to interesting animations), there is an infinite list of potential things to do to make the system better so that it is easier to create animations.
Some example things to try:
Note: we can't really help you do things beyond the basics.
Also, be sure to have the basic functionality working first - it is much more important in terms of your grade.
Into your handin directory, you will need to provide the complete source code, project files, and workspace files. You will need to provide a README.txt file explaining what each file you hand in is. You will need to provide a text file called "DOCUMENTATION.TXT" that can serve as a user manual for your program, describing which features you implemented, and how they are accessed.
You must also turn in some animations saved by your program.
You may not turn in more than 2 megabytes of files. You shouldn't need to turn in anywhere near this much, but if you feel the urge to turn in lots of big animations with images, be careful. There will be a stiff penalty for violating this rule.