
Video Mechanics: How to Make Video For Class
The final workbook will require you to submit a video. This posting will give you some ideas on the mechanics of how to do so: how to record it, upload it, and submit it.
Note: you are required to make a video that includes (1) a screen capture of your assignment and (2) your own voice (you may not use an AI voice! we really want to hear your own voice). You must place the video on some video sharing platform (we recommend the University’s Kaltura Mediaspace server) and provide the link in the workbook.
The important part of making a video is planning it and getting the content right.
In order to submit a video, you need to make a video (record it and probably edit it), upload it to some place where it can be played, and then add a link to it in the workbook. There are many ways to record the video. We recommend:
- Use Kaltura Capture to record your video. This has the advantage that it will record both your camera and your screen at the same time so you can edit them together. It will also automatically upload to Kaltura.
- Use MediaSpace (the University’s Kaltura site) to host your videos. Make sure to set the permissions such that we can view the video. If you submit a link to a video we cannot access, we may, at our discretion, send you an email about it or ignore the video submission entirely.
- Submit your link to the video by putting it into the corresponding textbox in the workbook. This will save it to the localstore so that we can see it when you submit your checkpoints and push your repo. We do not gaurentee which one we will look at so make sure you both submit your checkpoint and push your repo.
You are welcome to use other tools - as long as you can figure out how to give us a link to the video in a format that we can access and view.
Note: MediaSpace is the University’s Kaltura site. Kaltura is a video hosting system (kindof like an open-source YouTube).
Kaltura Capture
Kaltura Capture is the “official University supported solution”. It lets you record screen and camera and upload it to Kaltura (the university video sharing platform). It does allow you to upload both screen and camera (and audio) simultaneously.
To Download Kaltura Capture
- Open Mediaspace
- If you are not already logged in, click “Guest” in the top-right corner of the page and login (if the top-left corner says your name then you are already logged in).
- Click “Add New” (top menu).
- Click “Kaltura Capture”.
- Hidden at the bottom is a link “Download for Windows” and “Download for Mac” (pick one - if you’re on Linux, you’re out of luck)
- The first time it runs, it requires a lot of permissions (since it needs to access the screen for recording)
- Once it is installed, you can create a new recording by using the “Add New” button in MediaSpace (Kaltura). The web browser opens Kaltura Capture (and logs it in so it can upload).
To Record A Video Using Kaltura Capture
To record a video once Kaltura Capture is installed, either open the app you downloaded or navigate to https://mediaspace.wisc.edu/kalturacapture/launch/create which will open it for you (you will need to give it permission to do so).
If you have not recorded anything before, the user interface should have a big red button, a “Screen” button to select the screen to record, a “Camera” button to select which camera to use to record facecam footage, and an “Audio” button to select which audio source to record audio using. Once you have your settings as you want them, click the big red button to begin recording. If you have recorded a video before, you might be on a different screen with a list of your videos. Find and click the “New Recording” button to get to the recording interface (the aforementioned interface you see if you have not recorded anything before).
When you record a video, Kaltura Capture records the video as two separate streams (there are two video files) so you can load them into a multi-track editor (if you know how to do that). If you simply upload both streams together (using the button in Kaltura Capture) the Kaltura player will automatically do picture in picture.
Once you have finished recording, stop the recording using the stop button (the button with a red square on it). A screen should appear with “Title”, “Description”, and “Tags”. Fill these out appropriately. You can click “Save” to just save the video or “Save and Upload” to save the video and then upload it to the Kaltura Mediaspace (this will cause Kaltura to put the video streams together in a default way). Once the video is uploaded, a link should appear under its listing in the app. You can click on this link to get to the video in the Kaltura Mediaspace.
Kaltura has an online editor - but it is terrible (IMHO). As an experiment I (Gleicher) spent a little time vibe coding a “video mixer” that helps you assemble the pairs of videos into a single stream. It lets you switch between videos and picture-in-picture, trim off the ends, and export to a new video. This was mainly me learning to use Google Anti-Gravity. But I think it might actually be useful for making the short videos you need for class. Don’t have high expectations - it’s two hours of me learning how to vibe code.
If you want to edit the video locally (or just want to access the video streams), you can, from the screen that lists your videos (you can get to this screen from the recording interface by clicking the “Manage” button under the “kaltura” logo), click on the cog wheel on the left. This will open up the settings. There is a “Current recording directory:” box that should be listed. Go to the directory it states. The directory has separate “.mp4” files for the screen recording and the camera recording. The names are not human readable though, so you will have to manually search through the .mp4 files if you have recorded multiple times.
Kaltura MediaSpace
The best way to give us your videos is to store them on a video platform. You could put your videos on YouTube, but I recommend you use the University’s site: MediaSpace.
After you log into MediaSpace you can upload your videos. You need to make them public so that other people (like course staff) can watch them.
Upload A Video
To upload a video, you can either use the Kaltura Capture (to upload directly after recording the video) or you can go to here. You will need to say that you agree to the terms and conditions it shows you and then a file drop location will appear. You can either drag your video files there or click “Choose a file to upload” to open up your file explorer and select your video. I could not figure out how to combine the video streams once they are uploaded, so they should be combined first and then the video you upload should be the final version you want us to see.
When you upload a video, you will see a form (Title, Tags, etc.). Once you have filled this form out, save the video by clicking “Save”. This will save it as a Private video so we cannot see it. Click “Go To Media” and then follow the “Set Permissions” steps to make it so we can see it.
Set Permissions
First, navigate to your piece of media (the page should look something like the image below).
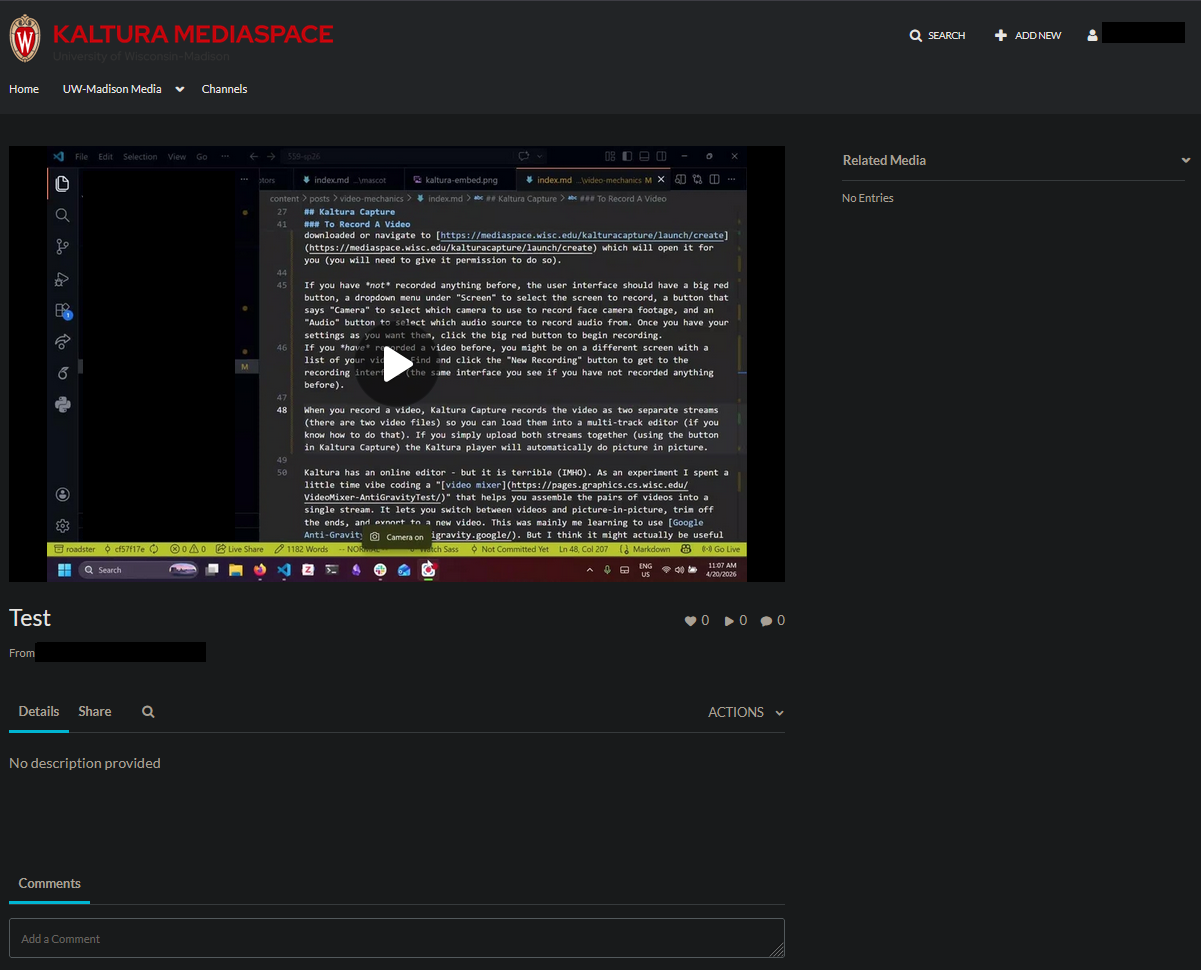
The MediaSpace interface for a specific piece of media.
Click on the “ACTIONS” button. A dropdown should appear. Click on the “Publish” button in the dropdown. The page should then look something like the following.
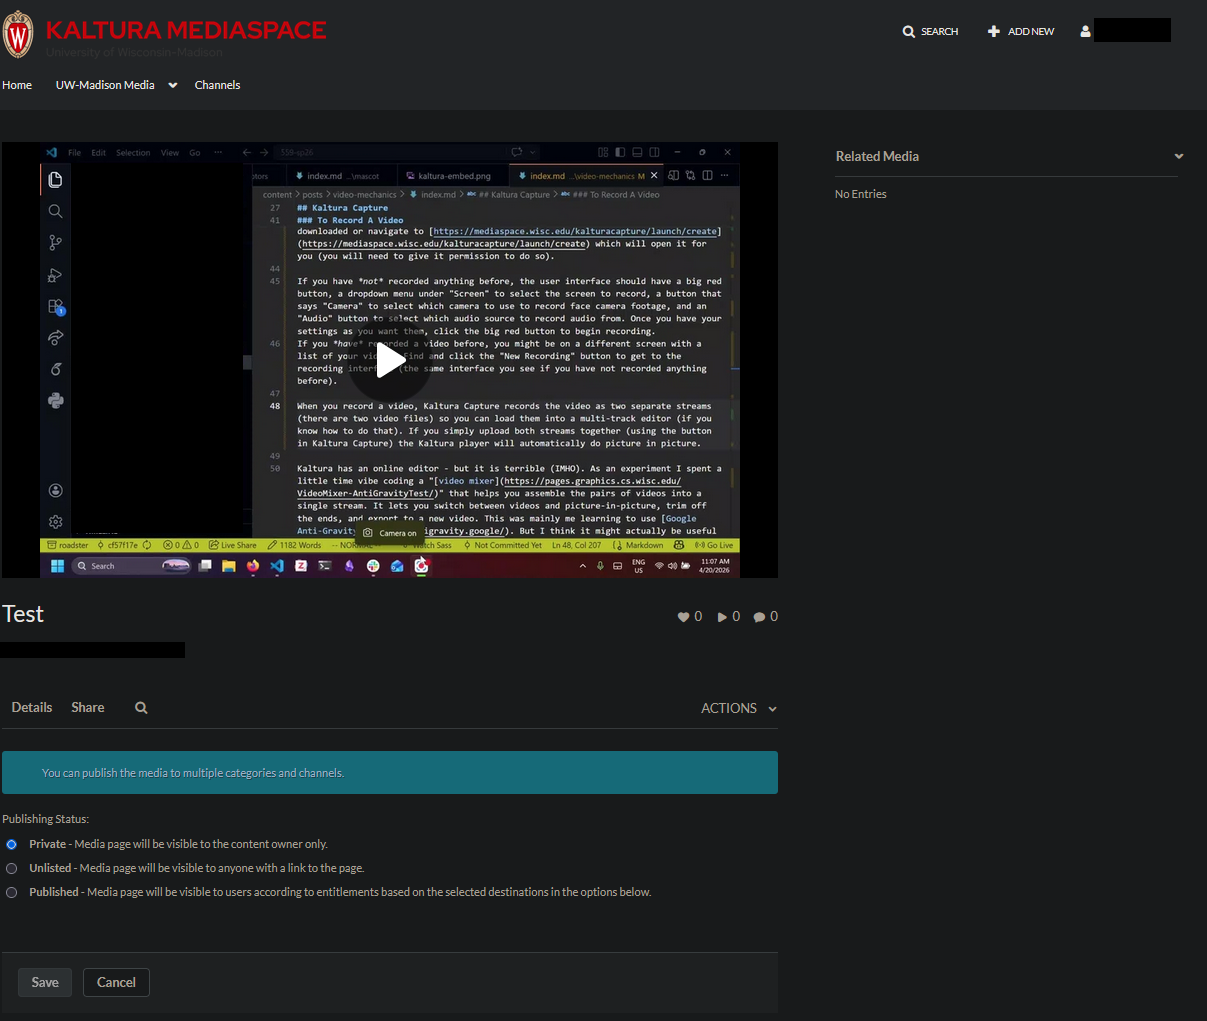
The MediaSpace interface when we can set the publish status.
Click on “Unlisted” and then click “Save”. A message should appear saying “Media successfully set to Unlisted”. If you see this, then you have successfully set the video to be unlisted. This means that anyone with the link can view it (including us). You could also set the video to “Published” if you are okay with other people seeing the video if they find your profile.
Get A Link
Once you have set the permissions for your media video, you can click the “Share” button and then the “Link to Media Page” button. You should then see a link to the video page. You can submit this link in the workbook and (assuming you gave us the correct permissions) we can view the video it links to.
Zoom
If you do not like the idea of using Kaltura Capture, Zoom is another option for recording videos. Since you are already required to have Zoom for class, we won’t go over installation here.
Record Using Zoom
To record using Zoom:
- Open Zoom and click “New Meeting.” (You can start it even if you’re the only participant.)
- Turn on your camera and microphone.
- Click on the “Share” button and share your screen.
- Move your webcam view to where you want it on the screen.
- Click the “Record” button in the bottom toolbar (it may be in the “More” menu).
- Click “Record to this computer” (this starts the recording)
- You can click on the “Record” button again to pause or stop the recording
- End the meeting and the recording will be saved to your computer (the recording’s location should be opened in the file explorer after you end the meeting but if this does not happen then the recording should be in your
Documents/Zoom/<Meeting Folder>directory)
Note that Zoom does not produce two video streams - your screen recording and camera recording are combined into a single video file. As such, you will need to make sure that your webcam video is where you want it for the video before you hit record. Make sure that your webcam video does not cover important parts of your screen in the final recording.
Record To The Cloud Using Zoom
If you do not want to host your video on Kaltura Mediaspace, you can host it in the Zoom cloud instead.
To record to the cloud using Zoom:
- Open Zoom and click “New Meeting.” (You can start it even if you’re the only participant.)
- Turn on your camera and microphone.
- Click on the “Share” button and share your screen.
- Move your webcam view to where you want it on the screen.
- Click the “Record” button in the bottom toolbar (it may be in the “More” menu).
- Click “Record to the cloud” (this starts the recording)
- You can click on the “Record” button again to pause or stop the recording
- End the meeting and the recording will be saved to the cloud
- Wait for the video to upload (it will do so in the background) and in a few minutes you should see a “Your video is ready to view” Zoom popup.
- Click on the “View” button of the popup to see your recording on Zoom (or go to the Zoom website, log in, click “Recordings” and then click “Cloud Recordings”).
Link To A Zoom Cloud Recording
If you recorded to the cloud, you will need to give us permission to view your recording and then copy the link.
- View your recordings on the Zoom website (after logging in) under “Recordings” > “Cloud Recordings”.
- Click the small arrow (the “Share” button) under your video.
- Click the cog in the top-right corner (the “Settings” button)
- Unselect the “Passcode” option (so that none of the options are selected)
- Click “Save”
- In the popup, click the back arrow
- Under “Link access”, select “Signed in to Zoom” in the drop down menu
- Click “Copy Link”
- Paste the link in the Workbook
Alternatives
You don’t have to use these tools.
You can use the screen and camera capture tools that are “built in” on most platforms. The built-in Screen Recorder on a Mac is easy. On Windows, there is a built in screen recorder on the “Game Bar”. I don’t have a modern Windows computer, so I haven’t tried this. The down side of these: you can’t get both the screen and the camera.
There are lots of fancier tools. Camtasia, a high-end tool, is my favorite. It does high quality captures and has an excellent editor. It is specifically designed for making “simple” videos - and has the right balance of the power and flexibility of general video editing tools, and a simplified interfaces targeted at the use case we have. The University has a license (see this page) and most grad students should have access. You can get it at the Campus Software Library. However, the license is for specific usages. I’ll let you decide if doing assignments for class qualifies.